
Drawing K: Unleashing Creativity with Simple Techniques
Drawing K is an exciting and creative activity for kids. It encourages imagination and fine motor skills.
In this blog post, we will explore the wonderful world of drawing the letter K. Drawing K may seem simple, but it offers many benefits for young learners. It helps children recognize shapes, lines, and patterns. By practicing the letter K, kids improve their handwriting and develop patience.
This activity also boosts their confidence as they see their progress. Let’s dive into the fun and engaging world of drawing K and discover how it can enhance your child’s creativity and learning.
Introduction To Drawing K
Drawing K offers a unique approach to art. It embraces creativity and fun. This method invites everyone to explore drawing in a new way. Whether you are a beginner or experienced, Drawing K has something for you. In this section, we will introduce you to the basics of Drawing K.
What Is Drawing K?
Drawing K is a modern drawing technique. It encourages free expression. Unlike traditional methods, Drawing K focuses on creativity. It does not stress perfection. This makes it accessible to all skill levels. Anyone can enjoy and benefit from Drawing K.
Importance Of Creativity
Creativity plays a key role in Drawing K. It allows you to think outside the box. This method helps you express your ideas. It promotes mental well-being. Drawing K boosts your confidence. You learn to appreciate your unique style. Creativity is not just for artists. Everyone can benefit from it.
Basic Materials Needed
Drawing is a fun and relaxing activity. It helps express creativity. To start drawing, you need some basic materials. These materials are easy to find and affordable. Let’s explore the essential tools and optional supplies.
Essential Tools
To begin drawing, you need a few key items. These are the must-haves for any artist.
- Pencils: A range of pencils from HB to 6B is ideal. They help create different shades and textures.
- Paper: Use a good quality drawing paper. It should be smooth and thick.
- Eraser: A soft, kneaded eraser works best. It helps to correct mistakes without damaging the paper.
- Sharpener: Keep your pencils sharp. A good sharpener is essential.
Optional Supplies
If you want to enhance your drawing experience, consider these optional supplies. They are not necessary but can be helpful.
| Item | Benefit |
|---|---|
| Blending Stumps | Smooth out pencil lines and create gradients. |
| Colored Pencils | Add color to your drawings. |
| Ruler | Draw straight lines and measure proportions. |
| Fixative Spray | Protect your finished drawings from smudging. |
These materials enhance your creativity. They make the drawing process easier and more enjoyable. Whether you stick to the basics or explore optional tools, drawing is a rewarding hobby.
Simple Drawing Techniques
Drawing can seem daunting to beginners. But with the right techniques, anyone can create beautiful art. This section will cover some basic drawing techniques to help you get started.
Line Drawing
Line drawing is the foundation of all art. It involves creating outlines to define shapes and forms. To start, practice drawing straight lines, curves, and circles. Use light strokes first. Then, darken the lines as needed.
Here are a few tips for effective line drawing:
- Keep your hand steady
- Use different line weights
- Experiment with various textures
Mastering line drawing will help you create more complex art pieces.
Shading Basics
Shading adds depth and realism to your drawings. It involves varying the lightness and darkness of your lines. Start by identifying the light source in your drawing.
Here are the basic shading techniques:
- Hatching: Draw closely spaced parallel lines.
- Cross-Hatching: Draw intersecting sets of parallel lines.
- Stippling: Use dots to create gradients and textures.
Practice these techniques to enhance your artwork’s dimensionality. Always blend the shades smoothly for a natural look.
Remember, practice makes perfect. Keep experimenting with different shading methods to find your style.
Exploring Patterns
Drawing is an art form that allows creativity to flow. Patterns are a crucial part of drawing. They add depth and interest to your artwork. Let’s delve into the world of patterns.
Geometric Patterns
Geometric patterns are all about shapes. They use circles, squares, triangles, and lines. These patterns are often symmetrical. They create a sense of order and harmony. Here are some common geometric patterns:
- Chevron: V-shaped lines repeating in a zigzag pattern.
- Honeycomb: Hexagonal shapes fitting together without gaps.
- Grid: Vertical and horizontal lines intersecting.
Using geometric patterns can make your drawing look structured. It gives a clean and modern feel.
Organic Patterns
Organic patterns are inspired by nature. They are free-flowing and irregular. These patterns mimic natural forms. They include leaves, flowers, and waves. Here are some examples:
- Leaf veins: Patterns that follow the veins of a leaf.
- Flower petals: Repeating shapes that form the petals of a flower.
- Wave patterns: Curved lines that mimic the movement of waves.
Organic patterns add a natural and relaxed feel to your drawing. They contrast with geometric patterns, offering a softer look.
Incorporating Color
Adding color to your drawings can bring them to life. It can enhance the mood, highlight important details, and make your artwork more engaging. This section will guide you through the basics of incorporating color into your drawings.
Choosing Colors
Choosing the right colors is crucial. Start with a color wheel to understand primary, secondary, and tertiary colors. Use complementary colors to create contrast.
Consider the emotion each color conveys. For example, blue is calming, while red is energetic. Use warm colors like red, orange, and yellow for excitement. Cool colors like blue, green, and purple are soothing.
| Color | Emotion |
|---|---|
| Red | Excitement |
| Blue | Calm |
| Yellow | Happiness |
| Green | Nature |
Blending Techniques
Blending colors can add depth and realism to your drawings. Start with a simple gradient. Choose two colors and blend them smoothly.
Use circular motions with your pencil or brush. Layering is another technique. Apply light layers of different colors. Build up the color gradually. For example:
- Apply a base color.
- Add a second color lightly.
- Blend with a blending tool or finger.
Experiment with different tools. Colored pencils, markers, and pastels each have unique blending properties. Practice to find what works best for you.
Remember, blending takes patience. Don’t rush. Enjoy the process of seeing your artwork evolve.
Creating Texture
Drawing textures can add depth and realism to your artwork. Textures help convey the feel of different surfaces. They make your drawings more interesting. Let’s explore some ways to create texture.
Using Different Tools
Different tools can create various textures. Pencils, charcoal, and ink each have unique qualities. Use a soft pencil for smooth textures. Charcoal can create rough, grainy textures. Ink pens provide sharp, clean lines.
Experiment with different tools. Try using a sponge or a brush. They can create unique textures. A palette knife can add interesting effects. Each tool will give a different result.
| Tool | Texture |
|---|---|
| Pencil | Smooth, fine lines |
| Charcoal | Rough, grainy |
| Ink Pen | Sharp, clean lines |
| Sponge | Soft, blotchy |
| Palette Knife | Bold, textured strokes |
Layering Methods
Layering can build texture. Start with a base layer. Add more layers to create depth. Each layer should be different. Use light strokes for the first layer. Apply more pressure for the next layers.
Vary your strokes. Use cross-hatching or stippling. These techniques add complexity. Try blending layers with your finger or a blending tool. This will create a smooth texture.
- Start with a base layer.
- Apply light strokes.
- Add more layers with varied pressure.
- Use different strokes (cross-hatching, stippling).
- Blend layers for smooth texture.
Layering methods can create interesting effects. Each layer adds depth. Experiment with different techniques.
Drawing From Imagination
Drawing from imagination allows you to create unique and personal artwork. It’s a skill that combines creativity, observation, and practice. With imagination, you can invent worlds, characters, and scenes. This kind of drawing can be both fun and challenging. It offers endless possibilities for creativity and expression.
Visualizing Ideas
Start by visualizing your ideas. Close your eyes and picture what you want to draw. Think about the shapes, colors, and details. Imagine the scene in your mind. This mental image serves as your blueprint. It guides your hand as you start drawing. Visualization strengthens your creativity and helps you plan your artwork.
Bringing Concepts To Life
Now, bring your concepts to life on paper. Use light, quick strokes to sketch your ideas. Don’t worry about perfection at this stage. Focus on capturing the essence of your imagination. Gradually add details and refine your drawing. This process transforms your mental image into a visual masterpiece. Remember, practice makes perfect. The more you draw, the better you’ll get at bringing your concepts to life.

Credit: lettering.org
Developing A Personal Style
Developing a personal style in drawing is a journey. It involves exploring different techniques and discovering what resonates with you. This unique style sets your artwork apart and makes it recognizable. It is a reflection of your personality and creativity. Let’s delve into how you can develop your own drawing style.
Experimenting With Techniques
Trying various drawing techniques can help you find your unique style. Use different tools like pencils, pens, or digital tablets. Experiment with shading, line thickness, and textures. Combine these elements in new ways. This will help you understand what works best for you. It can also spark new ideas and creativity.
Finding Inspiration
Look at the work of other artists. Study their techniques and styles. Take note of what you like and what you don’t. Visit art galleries, browse online portfolios, or read art books. Inspiration can come from many places. Nature, music, or even your daily life can spark creativity. Keep a sketchbook handy. Jot down ideas or draw quick sketches when inspiration strikes.
Sharing Your Art
Sharing your art can be a rewarding experience. It allows you to connect with others, receive feedback, and grow as an artist. Below are some effective ways to share your art and get noticed.
Showcasing Online
Showcasing your art online is a powerful way to reach a global audience. Here are some platforms and tips:
- Social Media: Platforms like Instagram, Facebook, and Twitter are excellent for sharing images. Use relevant hashtags and engage with your followers.
- Personal Website: Create a portfolio site to showcase your work professionally. Websites like WordPress or Wix offer easy-to-use templates.
- Online Galleries: Websites like DeviantArt, ArtStation, and Behance are dedicated to artists. These platforms allow you to share your work and connect with other artists.
Remember to keep your profiles updated. Regularly post new artwork and interact with your audience.
Participating In Art Communities
Joining art communities can offer support, inspiration, and opportunities. Here are some ways to get involved:
- Online Forums: Websites like Reddit and ConceptArt.org have active art communities. Join discussions, share your work, and get feedback.
- Local Art Groups: Look for art clubs or groups in your area. These can provide face-to-face interactions and local networking opportunities.
- Workshops and Classes: Attend workshops or online classes. They not only improve your skills but also help you meet other artists.
Art communities can offer valuable feedback. They can also help you stay motivated and inspired.

Credit: www.shutterstock.com
Credit: www.youtube.com
Frequently Asked Questions
What Is Drawing K?
Drawing K is an artistic technique focused on creating the letter ‘K’ with precision and style.
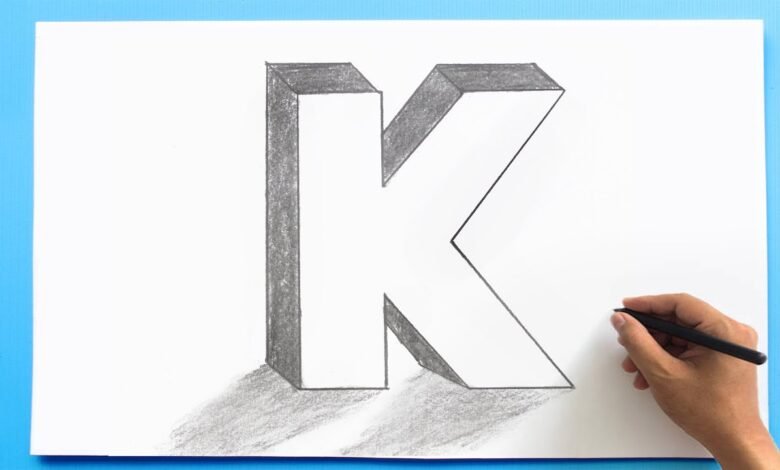
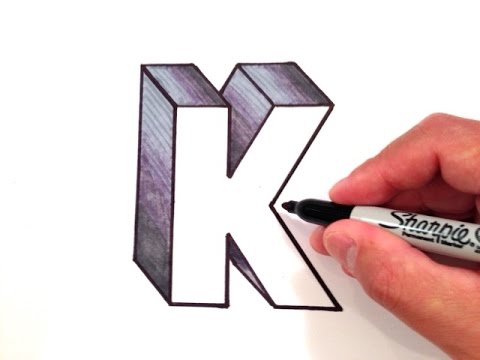
How To Draw The Letter K?
To draw the letter K, start with a vertical line. Then add two diagonal lines.
What Tools Are Needed For Drawing K?
Basic tools for Drawing K include a pencil, eraser, ruler, and paper.
Can Beginners Learn Drawing K?
Yes, beginners can easily learn Drawing K by following simple step-by-step instructions.
Conclusion
Drawing K can be both fun and rewarding. Practice makes every drawing better. Start with basic shapes. Then, add details gradually. Keep your lines smooth and gentle. Don’t worry about mistakes; they are part of learning. Use different tools to explore your style.
Finally, always enjoy the process. Happy drawing!