A Comprehensive Guide to Kleki Drawing: Unlocking Your Digital Creativity

In the world of digital art, tools like Kleki Drawing have gained immense popularity for their accessibility and ease of use. Whether you’re a seasoned artist or a beginner looking to explore your creativity, Kleki Drawing offers a versatile platform for making stunning digital art. This blog post will dive into the various features, tools, and tips you can use to make the most of Kleki Drawing.
What is Kleki Drawing?
Kleki Drawing is an online drawing tool that allows users to create digital art directly in their browser. It’s a free, user-friendly application suitable for beginners and experienced artists alike. Kleki Drawing supports a range of features including layers, brushes, and various color options, which enable users to experiment and enhance their creations. Whether you’re sketching, painting, or simply doodling, Kleki Drawing offers a hassle-free platform to bring your ideas to life.
Getting Started with Kleki Drawing: Interface Overview
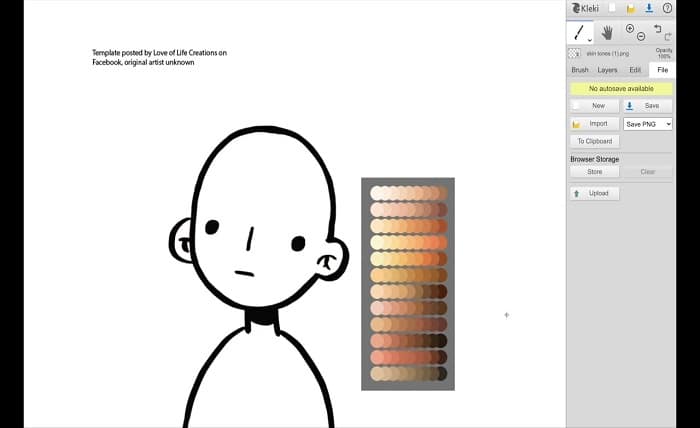
When you first open Kleki Drawing, you’ll be greeted with a simple and intuitive interface. The main canvas is where your artwork comes to life, while the toolbar on the side offers access to various tools and features. At the top of the page, you’ll find options to create new projects, save your work, or import images. The layers panel lets you work on different parts of your artwork separately, while the brush tool offers various customizable settings. The minimalist design ensures that you can focus on your art without distractions, making Kleki Drawing ideal for both beginners and professionals.
Essential Tools in Kleki Drawing for Beginners
One of the reasons Kleki Drawing stands out is its range of essential tools that are easy to use for newcomers to digital art. The brush tool is the most commonly used feature, allowing you to create strokes of varying thickness and opacity. Kleki Drawing also offers a selection of pre-made brushes for different effects like pencil sketches or painting. The eraser tool lets you correct mistakes, while the bucket tool allows for quick color filling. Beginners will appreciate the simple yet effective interface that makes it easy to get started with these basic tools.
Layers: Unlocking Creativity in Kleki Drawing
Layers are one of the most powerful features in Kleki Drawing. They enable you to work on separate elements of your artwork without affecting other parts of your creation. For instance, you can sketch on one layer, add colors on another, and apply shading or details on additional layers. This helps you maintain flexibility and precision, especially when working on more complex designs. Kleki Drawing makes it easy to add, delete, and rearrange layers, so you can experiment freely without worrying about ruining your artwork.
Exploring the Brush Options in Kleki Drawing
Kleki Drawing offers a variety of brushes, each tailored to different artistic styles and needs. Whether you’re creating fine-line art or broad, painterly strokes, you’ll find brushes that suit your preference. The tool allows you to adjust the size, opacity, and pressure sensitivity of the brushes, providing a more personalized and responsive experience. Some brushes mimic traditional media like watercolor or oil painting, while others are designed for digital effects. By experimenting with these different brushes, you can create dynamic textures and visual interest in your artwork.
Color Selection and Customization in Kleki Drawing
Color selection in Kleki Drawing is easy and highly customizable. The color picker tool allows you to choose from a wide range of colors, with an intuitive gradient selector to find the perfect shade. You can also create custom color palettes for consistency throughout your artwork. The platform supports various color models, including RGB and HEX codes, which means you can match colors precisely if you’re working on a project that requires specific hues. Kleki Drawing’s color wheel and gradient tools help artists select colors that suit their vision, making it easier to create harmonious and balanced compositions.
Using the Smudge and Blur Tools in Kleki Drawing
The smudge and blur tools in Kleki Drawing help add a professional touch to your artwork by creating smooth transitions and blending different colors or textures. The smudge tool works by pulling pixels from one area of your artwork and blending them into another, giving the impression of blending colors naturally. Similarly, the blur tool softens the edges of your strokes, helping you create smooth gradients and transitions between light and dark areas. These tools are especially useful for digital painters and illustrators looking to add depth and realism to their work.
Saving and Sharing Your Artwork in Kleki Drawing
Once you’ve completed your artwork, you’ll want to save it or share it with others. Kleki Drawing allows you to save your project in multiple file formats, such as PNG, JPEG, and even PSD for further editing in other software. If you’re working with layers, saving your work as a PSD file retains all of the layers, so you can continue editing it later. Kleki Drawing also offers options to share your work directly via social media or export your art to other platforms, making it easy to showcase your creations to the world.
Advanced Features in Kleki Drawing for Experienced Users
For more experienced digital artists, Kleki Drawing offers several advanced features to enhance your creative workflow. The symmetry tool allows you to create mirrored designs with ease, which is perfect for creating patterns or intricate mandala art. The tool also supports pressure sensitivity when used with a stylus, giving you greater control over your brushwork. Additionally, Kleki Drawing’s timeline feature helps you track and adjust the changes you make to your artwork. These features, combined with its straightforward interface, make Kleki Drawing a versatile option for artists at any skill level.
Tips and Tricks for Mastering Kleki Drawing
To get the most out of Kleki Drawing, it’s important to experiment with different techniques and settings. Here are a few tips to improve your workflow:
- Use layers: Always work on separate layers for different elements of your artwork.
- Master brush settings: Adjust brush size, pressure, and opacity to create varied strokes.
- Zoom in: For intricate details, use the zoom tool to work on specific areas of your artwork.
- Use shortcuts: Learn keyboard shortcuts to speed up your workflow.
- Keep practicing: Like any art form, practice is key. Don’t be afraid to experiment with new brushes and techniques.
By using these tips and staying patient, you’ll quickly improve your skills in Kleki Drawing and create more complex and polished artwork.
Conclusion
Kleki Drawing is an accessible and powerful tool for digital artists, offering a range of features that cater to beginners and seasoned professionals. With its simple interface, customizable brushes, layering system, and advanced tools, it provides everything needed to bring your artistic visions to life. Whether you’re sketching, painting, or experimenting with digital art, Kleki Drawing offers the flexibility and ease of use required for a seamless creative experience.
As with any tool, the key to mastering Kleki Drawing lies in practice and experimentation. So, take your time, explore all the features it has to offer, and let your creativity flow.
FAQs
- Is Kleki Drawing free to use?
Yes, Kleki Drawing is completely free and can be accessed directly from your web browser without any downloads. - Can I use a stylus with Kleki Drawing?
Yes, Kleki Drawing supports stylus input, including pressure sensitivity for more precise control over your artwork. - What file formats can I save my artwork in?
You can save your artwork in various formats, including PNG, JPEG, and PSD for further editing. - Can I use Kleki Drawing offline?
No, Kleki Drawing is an online platform and requires an internet connection to access and use the tool. - Does Kleki Drawing support animation?
Kleki Drawing does not natively support animation, but you can use its layers and timeline features to create frame-by-frame animations manually.


