Everything You Need to Know About Kleki Art Tool: A Complete Guide
The world of digital art is evolving rapidly, and with it comes a range of powerful tools that cater to artists of all skill levels. One such tool is the Kleki art tool, an online painting and drawing platform that is known for its accessibility and ease of use. Whether you’re an experienced digital artist or just getting started, Kleki offers a wide range of features that can enhance your creative process.
Kleki art tool is unique because it doesn’t require any downloads or installations. It’s entirely web-based, meaning you can start creating art instantly from your browser. The tool provides an array of brushes, tools, and customizable settings, allowing artists to experiment with different styles and techniques. In this blog post, we will dive deep into the features, uses, and advantages of Kleki, helping you understand why it’s become a popular choice among digital artists.
Features of Kleki Art Tool
Kleki art tool may be simple in its interface, but it is packed with powerful features that can help you create detailed and intricate artworks. Let’s explore some of the standout features that make Kleki a great choice for both beginners and professionals.
Intuitive Interface
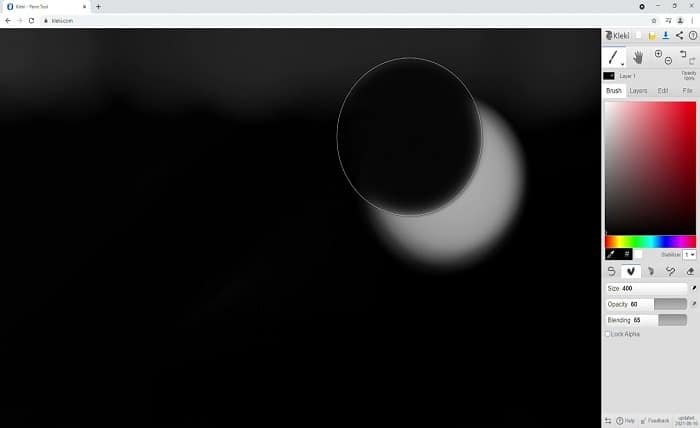
The first thing you’ll notice when you open the Kleki art tool is its user-friendly interface. The tool is designed to be intuitive and straightforward, which means you don’t need to be an expert in digital art to start using it. Everything you need is neatly arranged and easily accessible. The main canvas is front and center, while the brush and tool options are located on the sides of the screen. This design allows for a seamless workflow, making it easier to focus on your art rather than on navigating complex menus.
Variety of Brushes and Tools
The Kleki art tool offers a diverse selection of brushes and tools that can simulate real-world art materials. Whether you’re sketching, painting, or airbrushing, you’ll find a tool to match your needs. The brush settings allow you to adjust opacity, size, and pressure sensitivity, giving you the flexibility to create everything from soft, flowing strokes to bold, defined lines. The platform also includes other tools such as the eraser, smudge tool, and gradient tool, which can further enhance your artwork.
Layers for Complex Artwork
Layers are an essential part of digital artwork, and Kleki art tool doesn’t disappoint in this area. With the ability to create multiple layers, you can separate different elements of your artwork, making it easier to edit and adjust individual parts. Whether you’re drawing characters, backgrounds, or textures, layers allow you to maintain organization and flexibility throughout the creative process. Additionally, Kleki makes it easy to merge, delete, and adjust the opacity of your layers for optimal control.
Undo and Redo Functionality
Mistakes are a part of any creative process, and Kleki art tool provides a robust undo and redo feature that allows you to experiment freely without worrying about ruining your artwork. With just a click, you can step backward or forward in your progress, making it easier to try new techniques and correct errors on the fly. This feature is particularly helpful for artists who are exploring new styles or learning how to use digital tools.
How to Use Kleki Art Tool: A Beginner’s Guide
If you’re new to the Kleki art tool, the following steps will guide you through the basic features to get started. Even though the tool is relatively simple, taking a moment to understand its core functions will help you get the most out of it.
Step 1: Accessing Kleki Art Tool
The first step in using Kleki is to navigate to the Kleki website in your browser. There is no need to download or install any software, making it extremely accessible. Once you’re on the website, you’ll be presented with a blank canvas, ready for your creativity. You can start drawing right away or load an existing file to work on.
Step 2: Familiarizing Yourself with the Tools
On the left side of the canvas, you’ll find a vertical toolbar that contains all the essential tools. You can choose your brush, adjust the size, and pick from a range of colors to start your artwork. The toolbar also includes other tools like the eraser, smudge tool, and shape tool. Experiment with these options to get a feel for how they work.
Step 3: Utilizing Layers
Once you’ve chosen your tools, it’s time to start creating. The Kleki art tool’s layering system is a great way to separate your drawing into distinct elements. To add a new layer, click the “Layers” button, and select “Add Layer.” You can then start drawing on this layer, which keeps it independent from the background or other elements. Layers make it easier to modify parts of your artwork without affecting other sections.
Step 4: Saving and Exporting Your Artwork
Once you’re happy with your artwork, it’s time to save and export it. Kleki offers the option to save your work directly to your device as a PNG or JPEG file. Additionally, you can save your project on the Kleki platform by clicking on the save icon, which generates a unique link that you can use to access and continue working on your project later.
Tips for Mastering Kleki Art Tool
To become proficient with Kleki art tool, it’s essential to practice and explore its various features. Here are some helpful tips that can help you improve your skills and create more refined digital art:
Experiment with Brush Settings
Kleki offers a wide variety of brush settings that can dramatically change the appearance of your artwork. Experiment with adjusting the brush size, opacity, and pressure to see how they affect your strokes. Using different brushes for different effects—such as using a soft brush for shading and a sharp one for outlining—can give your work more depth and dimension.
Use Layers Strategically
When working with complex artwork, use layers to your advantage. Try to keep different parts of your artwork on separate layers, such as the background, foreground, and main characters. This approach will make it easier to make adjustments later on, as you can modify each layer individually without affecting the others.
Leverage the Smudge Tool for Blending
The smudge tool in Kleki is a great way to blend colors and create smooth transitions between shades. It’s perfect for creating gradients and soft textures in your artwork. Try using the smudge tool to blend your colors together, especially when painting skin, hair, or other surfaces that require a smooth, natural look.
Use the Undo and Redo Functions Frequently
As you create your artwork, don’t be afraid to make mistakes. Use the undo and redo functions to correct any errors and try different techniques. This flexibility will give you the confidence to experiment without the fear of ruining your work.
Advanced Features of Kleki Art Tool
While Kleki art tool is incredibly beginner-friendly, it also offers several advanced features for more experienced artists. These features allow you to create highly detailed artwork with greater precision and control.
Custom Brushes
Kleki allows you to create custom brushes to match your unique artistic style. By adjusting the brush settings, you can create brushes with specific textures and effects. For example, you can make a brush that simulates pencil strokes, or one that mimics the texture of a paintbrush on canvas. Custom brushes are a fantastic way to add a personal touch to your digital artwork.
Pressure Sensitivity
For artists using a drawing tablet, Kleki’s pressure sensitivity feature is a game-changer. This feature enables you to adjust the thickness and opacity of your strokes based on the amount of pressure you apply to the stylus. It’s an invaluable tool for achieving realistic brushwork and adding more fluidity to your strokes.
High-Resolution Canvas
Kleki also offers the ability to create high-resolution canvases, which is essential for professional-level artwork. A higher resolution canvas gives you more pixel data, allowing you to create finer details and avoid pixelation when zooming in or exporting your art.
Troubleshooting Common Kleki Art Tool Issues
Like any web-based tool, Kleki art tool may occasionally experience issues. Below are some common problems users may encounter and how to resolve them.
Slow Performance
If Kleki is running slowly, try refreshing the page or clearing your browser’s cache. A slow internet connection or heavy system usage can also contribute to performance issues, so try closing other tabs or applications while using the tool.
File Not Saving
If you’re having trouble saving your artwork, ensure that your internet connection is stable. Additionally, check that you’ve chosen the correct file format for saving your work. If problems persist, try saving the file to a different location or using a different browser.
Conclusion
In conclusion, Kleki art tool is a versatile and user-friendly platform for digital artists of all skill levels. Whether you’re just starting out or you’re a seasoned professional, Kleki offers the tools and features necessary to create stunning digital artwork. With its variety of brushes, layers, and customization options, Kleki provides endless possibilities for creativity. Plus, its accessibility as a web-based tool makes it easy to get started without any downloads or installations.
For those looking for a simple, effective, and fun way to create digital art, Kleki is certainly worth exploring.
FAQs
1. What is Kleki Art Tool?
Kleki Art Tool is an online painting and drawing tool that offers a variety of brushes, layers, and customization options to create digital artwork.
2. Is Kleki free to use?
Yes, Kleki is completely free to use. There are no charges or hidden fees associated with accessing or using its features.
3. Can I use a drawing tablet with Kleki?
Yes, Kleki supports pressure sensitivity and works well with drawing tablets, allowing for more detailed and natural brush strokes.
4. How do I save my artwork in Kleki?
You can save your artwork by clicking the save icon and choosing the desired file format, such as PNG or JPEG. You can also save it via a unique link for later access.
5. Does Kleki offer any advanced features?
Yes, Kleki offers advanced features such as custom brushes, pressure sensitivity, high-resolution canvases, and more, ideal for professional artists.