A Comprehensive Guide to Kleki Drawings: Exploring the Art of Digital Creativity
Digital art has revolutionized the way artists create, allowing them to experiment with various mediums and techniques without the constraints of traditional tools. Among the many platforms available for digital drawing, Kleki stands out as an accessible and user-friendly tool for both beginners and experienced artists. With its simple interface and powerful features, Kleki drawings have gained popularity, offering a platform where anyone can unleash their creativity. This post will explore everything you need to know about Kleki drawings, from basic techniques to advanced tips and tricks for creating stunning digital artwork.
What are Kleki Drawings?
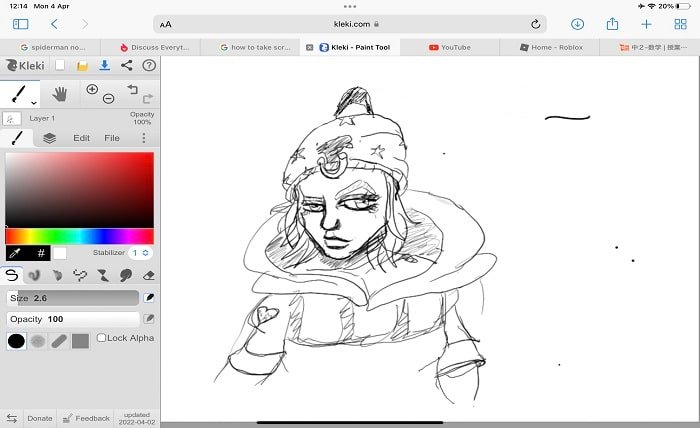
Kleki drawings are digital artworks created using Kleki, an online drawing tool that allows users to create drawings, paintings, and sketches without the need for expensive software. Kleki is a free, web-based tool that provides essential drawing features, including a variety of brushes, layers, and tools for precise control. Whether you’re a beginner just starting to explore digital art or a professional looking for a simple platform to create quick sketches, Kleki is an excellent choice for creating Kleki drawings.
Kleki is designed to be intuitive and easy to use, making it an ideal tool for creating digital art directly in your browser. With features like pressure sensitivity, blending modes, and the ability to work with layers, Kleki offers a great environment for creating everything from simple doodles to more complex and detailed artwork. The platform also supports touch and stylus input, making it versatile and adaptable to different devices, such as tablets and smartphones.
The Features of Kleki for Drawing
When it comes to creating Kleki drawings, the tool provides several key features that help artists bring their ideas to life. Let’s break down some of the most important features of Kleki that contribute to its growing popularity:
- Brush Selection
Kleki provides a variety of brushes, including pencil, airbrush, and paintbrush options. These brushes can be adjusted for different effects, making it easier to achieve the desired texture and style for your Kleki drawings. - Layer Support
Layers are essential for digital artwork, and Kleki makes it easy to work with them. Users can create multiple layers, allowing for more control over individual elements of the drawing. This makes it easier to experiment and adjust specific areas without affecting the rest of the artwork. - Opacity and Blending Modes
Kleki allows artists to adjust the opacity of layers and brushes, as well as experiment with different blending modes. This gives you more creative freedom when creating Kleki drawings, as you can blend colors and textures to achieve a variety of effects. - Pressure Sensitivity
For artists who use a stylus or tablet, Kleki offers pressure sensitivity, which allows you to control the thickness and opacity of your lines based on the pressure you apply. This feature is essential for creating smooth, organic strokes and adding depth to your Kleki drawings. - Simple User Interface
Kleki’s user interface is straightforward and minimalistic, making it easy for beginners to start drawing right away. The layout is intuitive, and all the essential tools are easily accessible from the main screen, ensuring a smooth drawing experience. - Exporting and Saving
Once your Kleki drawings are complete, you can easily export them in various formats, such as PNG, JPEG, or even PSD (Photoshop). This allows you to share your artwork on social media, incorporate it into other projects, or continue working on it in more advanced software.
How to Start Drawing with Kleki
Getting started with Kleki drawings is simple, and you don’t need any prior experience to create your first piece of artwork. Here’s a step-by-step guide on how to start drawing with Kleki:
- Visit the Kleki Website
The first step is to visit the Kleki website (www.kleki.com) from your browser. No account or software installation is required to begin drawing. - Select Your Tools
Once on the homepage, you’ll be greeted with a blank canvas and a variety of drawing tools. Start by selecting the brush you want to use. You can choose from options like pencil, paintbrush, or airbrush, and adjust the brush size and opacity according to your preferences. - Start Drawing
Use your mouse, touchpad, or stylus to start creating your Kleki drawings. Don’t be afraid to experiment with different strokes and styles to see what works best for you. - Add Layers
If you want to make more complex artwork, consider adding layers. This will give you more flexibility and allow you to edit specific parts of your drawing without affecting the entire piece. - Save and Export
Once you’re happy with your Kleki drawing, make sure to save your work. You can export the image to your device or share it directly on social media.
Tips for Improving Your Kleki Drawings
While Kleki is easy to use, there are several techniques you can apply to improve your digital artwork and take your Kleki drawings to the next level. Here are some tips to help you enhance your skills:
- Practice with Different Brushes
Experiment with the various brushes available in Kleki. Try using a pencil for sketching and an airbrush for shading to create depth in your Kleki drawings. Switching between brushes will help you discover new textures and effects. - Use Layers Effectively
Make sure to use layers for different elements of your drawing. For example, you can use one layer for the background, another for the character, and a separate one for the details. This will give you more control and flexibility when editing and refining your Kleki drawings. - Master the Undo/Redo Function
Mistakes happen, but Kleki’s undo and redo functions are here to help. Use these features to correct any errors or try out different ideas without fear of losing your progress. - Experiment with Opacity
Adjusting the opacity of your brushes or layers can create smooth transitions and blending effects in your Kleki drawings. Try lowering the opacity for subtle shading or highlighting areas for emphasis. - Study Digital Art Techniques
While Kleki is a great tool, learning basic digital art techniques such as color theory, composition, and lighting will help you create more professional-looking artwork. There are plenty of online tutorials and resources that can guide you in mastering these techniques.
Common Mistakes to Avoid in Kleki Drawings
While Kleki is a simple tool, there are still a few common mistakes that beginners often make when creating their drawings. Avoiding these mistakes will help you create cleaner, more polished Kleki drawings:
- Overusing Layers
While layers are useful, it’s important not to overcomplicate your artwork with too many layers. Keep your layers organized and don’t create unnecessary ones that make editing more difficult. - Neglecting Composition
Even though Kleki is a digital drawing tool, the basic principles of composition still apply. Avoid placing elements too close to the edges or neglecting balance and proportion in your drawings. - Ignoring Brush Settings
Different brushes can create vastly different effects, so make sure you adjust the brush settings according to your needs. Don’t stick to the default settings if you’re looking for specific textures or effects in your Kleki drawings. - Not Using Reference Images
If you’re new to digital art, using reference images can be extremely helpful. Reference images provide guidelines for proportions, lighting, and positioning, which can help you create more accurate and detailed Kleki drawings. - Skipping the Shading Process
Shading adds depth and realism to your Kleki drawings. Don’t skip this step; instead, take your time to add shadows and highlights to your artwork for a more professional finish.
Why Kleki Drawings Are Perfect for Beginners
One of the main reasons Kleki has become a popular tool among aspiring digital artists is its accessibility. Here’s why Kleki drawings are perfect for beginners:
- No Setup Required
Unlike other drawing software that requires installation or a subscription, Kleki is entirely web-based and free to use. All you need is an internet connection to start drawing. - Simple Interface
Kleki’s user interface is intuitive and minimalistic, making it easy for beginners to understand and use. All the essential tools are right at your fingertips, so you can start creating without being overwhelmed by complicated features. - Learning Resources
There are plenty of tutorials available online that focus on using Kleki, which makes it easy for beginners to learn the ropes and start creating their own digital art in no time. - Low Pressure
Since Kleki is free to use and there’s no need to worry about saving expensive projects, beginners can experiment with different techniques and tools without the pressure of spending money on expensive software.
Conclusion
Kleki drawings offer a fantastic opportunity for artists of all levels to explore digital art. Whether you’re just starting or looking to refine your skills, Kleki provides a user-friendly platform that supports creativity and experimentation. With its range of features like brush selection, layering, and pressure sensitivity, Kleki is a versatile tool that can help you create stunning digital artwork. By practicing and following the tips shared in this post, you’ll be on your way to mastering Kleki drawings in no time.
FAQs
- What is Kleki?
Kleki is a free, online drawing tool that allows users to create digital artwork using various brushes, layers, and tools. - Is Kleki suitable for beginners?
Yes, Kleki is perfect for beginners due to its simple interface and intuitive tools that make it easy to get started with digital art. - Can I use Kleki on mobile devices?
Yes, Kleki is designed to be mobile-friendly and can be used on smartphones and tablets, making it accessible on a variety of devices. - How can I improve my Kleki drawings?
You can improve your Kleki drawings by experimenting with different brushes, using layers, and studying basic digital art techniques like shading and color theory. - Can I save my Kleki drawings?
Yes, you can save your Kleki drawings by exporting them in various formats such as PNG, JPEG, or PSD.