
How to Blend in Kleki: Master Digital Art Techniques
Blending in Kleki is simple with the right tips. You can create smooth transitions and seamless artwork in no time.
Kleki is a free online painting tool. It offers various features for digital artists. Whether you are a beginner or experienced, blending in Kleki can enhance your artwork. Blending helps in creating smooth transitions between colors and shades. This guide will help you understand how to blend effectively using Kleki.
You’ll learn basic techniques and tips to improve your digital paintings. Let’s explore the process and make your art come alive with beautiful blends.
Introduction To Kleki
Are you a digital artist or someone who loves to draw? Understanding how to blend in Kleki can transform your digital artwork. This blog post will guide you through the basics of Kleki and its blending features.
What Is Kleki?
Kleki is a free online painting and drawing application. It is simple to use yet powerful enough for creating stunning digital art. You can access it directly from your web browser without any downloads.
This makes it a convenient tool for artists at all levels. Whether you are just starting or already experienced, Kleki has something for you.
Features And Tools
Kleki offers a variety of features and tools that make it unique. Here are some of the key ones:
- Brushes: Various brush types for different effects.
- Layers: Support for multiple layers to structure your artwork.
- Blending: Tools to help you blend colors smoothly.
- Undo/Redo: Easily correct mistakes with the undo and redo options.
- Import/Export: Import images to edit and export your final work.
Let’s look at these tools in more detail:
| Tool | Description |
|---|---|
| Brushes | Choose from different brush types to create unique textures. |
| Layers | Add depth to your artwork by working on multiple layers. |
| Blending | Blend colors smoothly for a more natural look. |
| Undo/Redo | Easily fix any mistakes with the undo and redo functions. |
| Import/Export | Import images for editing and export your final piece in various formats. |
These tools make Kleki an excellent choice for digital artists. Each feature is designed to enhance your creative process and make drawing enjoyable.

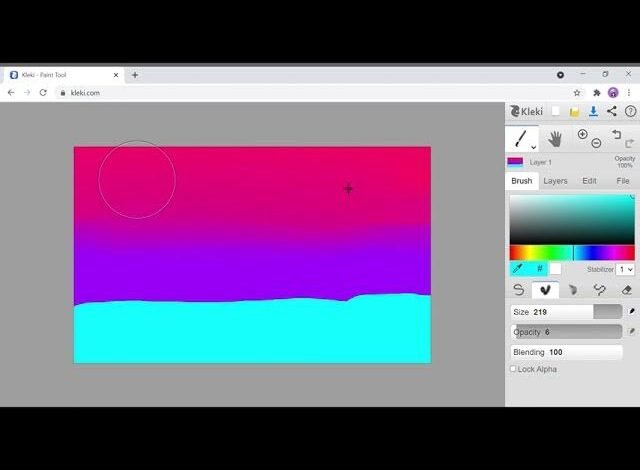
Credit: www.tiktok.com
Getting Started
Welcome to your journey on blending in Kleki! Kleki is a powerful yet simple digital painting tool. Whether you’re a beginner or an experienced artist, blending colors will elevate your artwork. Let’s dive into the basics and get you started with blending in Kleki.
Setting Up Your Workspace
Before you start blending, you need to set up your workspace. A clutter-free workspace helps you focus. Follow these steps to set up Kleki for blending:
- Open Kleki in your web browser.
- Adjust the canvas size according to your project needs.
- Familiarize yourself with the interface layout.
- Ensure your stylus or mouse is working properly.
Take a moment to organize your tools. A well-organized workspace enhances productivity.
Basic Tools Overview
Understanding the basic tools in Kleki is crucial. Here is a brief overview of essential tools for blending:
| Tool | Description |
|---|---|
| Brush Tool | Use this for painting and blending colors. Adjust size and opacity as needed. |
| Eraser Tool | Remove unwanted strokes or clean up edges. Modify size and softness for precision. |
| Smudge Tool | Blend colors seamlessly. Change strength and size for varied effects. |
| Color Picker | Select colors from your artwork. Ensure smooth transitions between shades. |
| Layers Panel | Manage different elements of your artwork. Use layers for non-destructive editing. |
These tools are essential for any blending task. Spend some time experimenting with each tool. This will help you understand their capabilities.
Brush Techniques
Blending in Kleki can elevate your digital art. Brush techniques are key to achieving smooth and seamless blends. They allow for greater control and precision. This section will guide you through the essentials of brush techniques for blending.
Choosing The Right Brush
Start by selecting the right brush for your project. Kleki offers various brushes. Each has unique qualities. Soft brushes are great for smooth transitions. Hard brushes add sharp details. Experiment with different brushes. Find what works best for your style.
Adjusting Brush Settings
Adjusting brush settings is crucial for blending. Focus on opacity and size. Lower opacity for softer blends. Increase size for larger areas. Use pressure sensitivity if available. It adds a natural touch. Practice with these settings. They help achieve desired effects.
Layer Management
Layer management is essential for blending in Kleki. It helps create organized and seamless artwork. Good layer management allows you to control different elements separately. This makes editing and blending easier.
Creating And Organizing Layers
Start by creating multiple layers for different parts of your artwork. This lets you work on one part without affecting others. To create a new layer, click on the “New Layer” button. Name your layers to keep track of them. For example, name one layer “Background” and another “Foreground”. This organization helps you find and edit layers quickly.
Keep related elements on the same layer. For example, place all background elements on the “Background” layer. This keeps your project tidy and makes blending easier. You can also group similar layers together. Use the “Group Layers” option to combine layers. This way, you can move or edit them as one unit.
Blending Modes
Blending modes change how layers interact with each other. They create different effects based on the mode you choose. To change a layer’s blending mode, select the layer first. Then, choose a blending mode from the drop-down menu. Some common blending modes are “Multiply”, “Overlay”, and “Screen”.
Experiment with different modes to see their effects. For example, use “Multiply” to darken colors and add depth. Use “Overlay” to enhance contrast and make colors pop. “Screen” lightens colors and creates a glowing effect. Adjust the opacity of layers to fine-tune the blending. Lower opacity makes the layer more transparent. This helps blend layers smoothly.
Color Blending
Color Blending in Kleki can turn your digital art into a seamless masterpiece. By smoothly transitioning between colors, you create depth and dimension. In this guide, explore the basics of color theory and how to use the color picker in Kleki for effective blending.
Color Theory Basics
Understanding color theory is crucial for blending. Colors have relationships with each other. The color wheel shows these relationships:
- Primary Colors: Red, blue, yellow.
- Secondary Colors: Green, orange, purple. Made by mixing primary colors.
- Tertiary Colors: Made by mixing a primary and a secondary color.
These colors can create harmonies:
- Complementary: Opposite on the color wheel. High contrast.
- Analogous: Next to each other on the color wheel. Harmonious.
- Triadic: Evenly spaced around the color wheel. Vibrant.
Using The Color Picker
The color picker in Kleki is a powerful tool. It helps you choose and blend colors effectively. Here are the steps:
- Click on the color picker tool in the toolbar.
- Select a color from the color wheel or input a hex code.
- Use the sliders to adjust the hue, saturation, and brightness.
To blend colors:
- Choose your base color.
- Select a secondary color that complements or contrasts.
- Use the brush tool to softly mix the colors on the canvas.
Experiment with opacity and layer settings to achieve a smoother blend. Practice these techniques to improve your color blending skills in Kleki.
Shading And Highlights
Learning how to blend in Kleki can elevate your digital art. Shading and highlights play a crucial role. They bring your creations to life, adding depth and realism.
Creating Depth With Shading
Shading is the foundation of creating depth. Start by choosing a base color. Then, select a slightly darker shade for the shadow. Apply this darker shade to areas that would naturally be darker. This could be the underside of objects or areas blocked from light. Use a soft brush for smooth transitions. Blend the colors gently to avoid harsh lines.
Layering is key in shading. Build up the layers gradually. This gives a more natural look. Remember to consider the light source. It determines where shadows fall. Practice and patience will improve your shading skills over time.
Adding Realistic Highlights
Highlights add brightness and dimension. Choose a lighter shade of your base color. Apply this to areas that catch the most light. This could be the top of an object or the side facing the light source. Use a small brush for precision.
Blend the highlight into the base color. This creates a smooth transition. Highlights should be subtle. Too much can make the art look unrealistic. A little goes a long way. Experiment with different highlight intensities. This helps find the right balance for your artwork.
Texture And Details
Texture and Details are key elements that can elevate your artwork in Kleki. They add depth, realism, and a professional touch to your digital paintings. Understanding how to effectively apply textures and detailing techniques can bring your creations to life.
Applying Textures
Textures can make your digital art look more realistic. In Kleki, applying textures is simple yet powerful. Follow these steps to add textures to your artwork:
- Select the Texture Tool from the toolbar.
- Choose a texture from the available options.
- Adjust the opacity and scale to fit your design.
- Apply the texture by brushing over the desired area.
Experiment with different textures. Try combining them to create unique effects. Remember to keep the textures consistent with the overall theme of your artwork.
Detailing Techniques
Details add character to your digital paintings. They can help highlight important features and make the artwork more engaging. Here are some effective detailing techniques:
- Layering: Use multiple layers to add depth and detail. Each layer can focus on different elements, such as shadows, highlights, and mid-tones.
- Brush Settings: Adjust the brush settings like size, opacity, and hardness. This helps in achieving precise details.
- Zoom In: Zoom in to work on fine details. This allows for better control and accuracy.
- Color Variations: Use slight color variations to add realism. This technique is especially useful for skin tones, foliage, and textures.
Practice these techniques regularly. Over time, your detailing skills will improve, making your artwork more polished and professional.
| Technique | Purpose | Tips |
|---|---|---|
| Layering | Adds depth | Use separate layers for shadows and highlights |
| Brush Settings | Achieves precision | Experiment with size and opacity |
| Zoom In | Improves accuracy | Focus on small areas |
| Color Variations | Adds realism | Use subtle changes in hue |
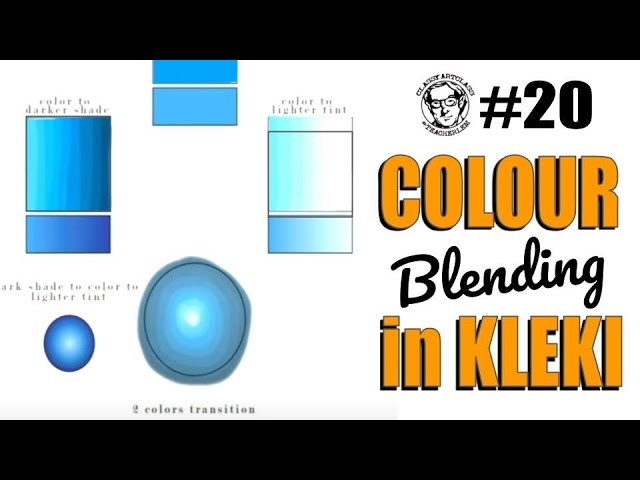
Credit: www.youtube.com
Final Touches
Final Touches are crucial in making your artwork stand out. In this section, we will focus on refining your artwork and exporting your masterpiece in Kleki. These steps ensure your final piece is polished and ready to share.
Refining Your Artwork
After blending in Kleki, the details matter. Zoom in to check for any rough edges or misplaced strokes. Use the smudge tool to smooth out areas. Don’t forget to adjust the opacity for a more natural look. Work on the details and make sure everything blends seamlessly.
Consider using the eraser tool to clean up any unwanted marks. A smaller brush size can help with precision. If necessary, add new layers for additional blending. This way, you can work on specific areas without affecting the entire piece.
Exporting Your Masterpiece
Once satisfied with your artwork, it’s time to export. Go to the File menu and select Export. You can choose from various formats such as PNG or JPEG. Make sure to select the highest resolution for the best quality.
Name your file appropriately and save it to your desired location. It’s also a good idea to create a backup. This way, you can always return to the original file for future edits.
| File Format | Use Case |
|---|---|
| PNG | Best for high-quality images and transparency. |
| JPEG | Ideal for web use and smaller file sizes. |
Following these steps ensures your artwork is refined and ready to share. Happy creating!
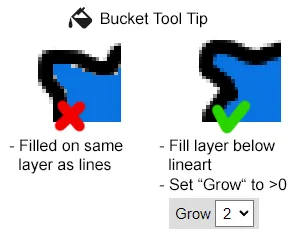
Credit: kleki.com
Frequently Asked Questions
How Do You Blend In Kleki?
To blend in Kleki, use the Smudge tool. Adjust the brush size and opacity for smooth blending. Practice on different layers to get the best result.
Can I Blend Colors In Kleki?
Yes, you can blend colors in Kleki. Select the Smudge tool and gently drag colors to mix them. Adjust settings for better control.
What Tools Help With Blending?
The Smudge tool is essential for blending in Kleki. Adjust brush size, opacity, and pressure to achieve the desired blending effect.
How To Fix Blending Mistakes?
To fix blending mistakes, use the Undo button or the Eraser tool. Adjust the brush size to correct specific areas without affecting the entire artwork.
Conclusion
Blending in Kleki can be fun and easy. Practice the techniques shared. Experiment with colors and tools. Your art will improve over time. The key is patience and creativity. Don’t rush the process. Enjoy creating unique pieces. Happy blending!